


Gluing is a tricky, time-consuming process. © Jason Gardner
Gluing tubulars is tricky business. And writing about it is just as difficult, if not more so. After all, everyone has his or her own gluing style, and everyone will tell you that his or her style is the “best one.” One of our brave mechanics, Jason Gardner of Jinji Cycles, decided to share his expertise with us.
by Jason Gardner of Jinji Cycles
One of the greatest lessons I learned from my first bike shop boss was that as a mechanic, I have the rider’s safety in my hands and I must consider that in every service function I perform. I have found this lesson most poignant in the gluing of tubular tires. Poorly glued tires can have catastrophic consequences for equipment and, unfortunately, for riders as well. What follows is a process and set of rules that I have employed for the past five years, under which I have yet to have a rider roll a tire. The essentials of this process come from Calvin Jones of Park Tool and Colin Howat of the University of Kansas Department of Chemical and Petroleum Engineering through USA Cycling’s mechanic licensing program. These two men have spend countless hours developing the best possible procedure for tubular tire installation with the constant goal of providing the highest possible safety conditions for users of tubular tires. This article will consider the installation of a new tire onto a new rim. We will begin with basic preparation and then a specific process for glue application and tire installation.
Gather your materials first to ensure that you have everything. You’ll need your tire, wheel, glue, acid brush, cleaning solvent and nitrile gloves. Use tubular tire-specific glue and go ahead and purchase the full can; it will make your life much easier. Acid or grease brushes can be easily obtained from any hardware store. Nitrile gloves withstand the glue solvents much better than latex, which falls apart rather easily. Gloves are optional but your fingertips will thank you; the down side to gloves is that they can more easily stick to your brush and glue can. For cleaning solvent, rubbing alcohol is OK but weak. Acetone is also a good option. Brake or carburetor cleaners are very effective but possibly too strong as well as difficult to control in aerosol cans; use extreme care if considering these options.
This is an excellent time to pre-stretch the tire. If you have the time to let your unglued tire sit inflated on your rim for a day or so, then go ahead and let the rim do some of your pre-stretching. You can also simply loop the tire around your shoulders and stretch with either your elbows and palms or even your knees if you need some more leverage. Remember, the tire has to stretch this much just to get on the rim in the first place so don’t be too timid about giving it a good effort. When stretching though, be aware of where the base tape seam is; it is easy to pull at the seam and peel some of the base tape where it overlaps itself. This can be rectified but it is best to avoid it in the first place.
You are now ready to glue.

Pinch the tire together such that it makes a figure eight and hold it that way; this will allow you to coat one half of the base tape without moving the tire around. © Jason Gardner
The basic goal of the gluing process is to produce a cured layer to the base tape and a built-up contact layer to the rim. First, apply some glue to the tire base tape. Inflate the tire until it rolls itself inside out and leaves the base tap layer sticking outward. Pinch the tire together such that it makes a figure eight and hold it that way; this will allow you to coat one half of the base tape without moving the tire around. Using the acid brush, apply a liberal, but even, coat of glue to the base tape, taking care to coat the base tape from edge to edge. While still pinching the tire in the middle, rotate it around to coat the other half. The tire can now sit for a day and a half until the rim is ready.
Next, clean the rim with your cleaning solvent. [Need to remove old glue from a used rim? Read our last article on how to clean rims the best.] Then, thoroughly coat the rim surface taking specific care to extend glue all the way to the edges. Apply with an upward brush stroke that starts in the middle and extends upward off the edge of the rim. Avoid the back and forth “painter’s” stroke as it more easily creates lumps in the glue layer. Coat the rim all the way around making sure both edges are fully covered. I cannot stress enough how important the edges are. If a tire is going to roll, it has to start at the edge and proper contact at the edges is critical to ensuring that your tire stays put.

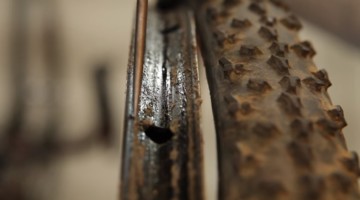
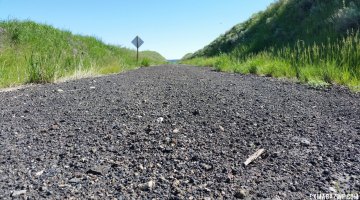
Here is an example of a rim that was not sufficiently glued to the edges and was much to easy to peel back. © Jason Gardner
Allow the rim to dry for twenty-four hours, then apply another coat. Allow that coat to dry for twelve hours. After twelve hours you are ready to apply a final coat to the rim and install the tire. For tire installation, install the valve first. Then, with your hands set a few inches either side of the valve, begin to install the tire by pulling the tire and stretching it as you work your hands opposite each other toward the other side from the valve. This gradual stretching as you work around the rim will make pulling that last bit on much easier. Once the tire is on the glue is going to start to bond and you will need to work quickly to get the tire centered and straight. Use the base to tire seam as a guide but not a rule in centering the tire. Your primary rule will be the tire itself and how smoothly it rolls when spinning the wheel. When centering, pull up on the tire to separate it in that spot from the rim and turn as necessary to center it. Do not be overly concerned about some glue on the braking track as it can be cleaned later or the brake pads themselves will wear it off. It is important that you inspect the edge for complete glue contact; some glue may be applied to the edges after the fact if you feel it is necessary to ensure better adhesion.
Finally, let the wheel set for twenty-four hours to cure before riding. Then, go have some fun.
Still have tire questions? Check out our recent columns:
Gluing Tubies: How Clean is Clean Enough?
Gluing and Taping Tubulars the Belgian Way
And, if you like Jason Gardner’s mechanical style, check out his last column, Avoiding The Dreaded DNF.