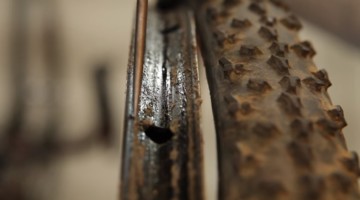


How much glue should you leave on the rim when cleaning? © Kenton Berg
Gluing tubulars can be stressful enough, and there are so many different “best ways” of getting the job done. This week, we wanted to look at one question that we hear a lot when talking about gluing up tubulars: when gluing new tires on a wheel that’s been used and glued before, what kind of prep should you be doing? And more specifically, how clean do you want your rims to be before gluing on new tires?
Kenton Berg:
Folks, here’s a shocker: there are several schools of thought when it comes to gluing tubulars and the preparation that goes into it. Actually, this is more of a philosophical and religious conversation … everyone has ideals, thoughts and practices on tubular prep and gluing and will stand by those to the death.
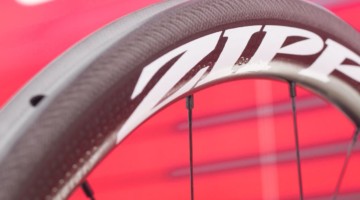
All kidding aside, what works for one rider may not work for another, especially if they are working with different wheel types (think deeper rim bed like Zipp 303’s vs shallow bed) or compounds (aluminum vs. carbon).
With all this in mind, what I prefer to do, given that I’m anal about my prep and I mind the 6 P’s (prior proper prepping prevents poor performance), is to clean the old glue off as best possible. Now, this takes some time and some elbow grease, but my philosophy is the cleaner the surface the better the bond. Whether this is on my aluminum or my carbon wheels (road or ‘cross), the prep is the same.

The hairdrier: unlikely tool of cyclists everywhere. © Kenton Berg
To get this bit of misery done I employ two key tools. The circa 1988ish two-tone Clairol hair dryer and a modified cheese knife. By now many of you are shaking your heads and wondering if I’ve been sniffing the glue instead, but bear with me on this … there is a method to this madness. It goes like this: a little bit of heating on the glue, one small section at a time, with the trusty Clairol will loosen it up and make it more malleable. With the cheese knife (it has a rounded and dull end) in hand I start working the glue loose from the right side of the wheel bed to the left with the rounded end of the knife. After working it out of the bed, I’ll start leveraging it off the rim in chunks and peeling it away. The dull blade of a cheese knife lets me avoid rim damage and also use the edge of the blade to scrape the rim bead areas and get as much glue off the rim as possible. I know many a ’crosser out there will use Goof Off or other solvents to nuke the glue off, I just prefer to avoid the chemical high.
Once I complete a rim, I’ll go back over it and see what’s left that can be removed, or smoothed out, and then move on to tire prep and stretching. This method, while crude, has been tried and true over the past 3 seasons and along with the use of Mastik One glue to put the tires back on, I haven’t rolled a tubular yet.
Here’s what a few of our other mechanics-on-deck had to say about how much glue to leave on tires. They also added recommendations of their favorite glues.
Todd Schoeni:
Most of the time we try to clean every rim back to its original state. It’s a tedious process, but necessary to make sure the tire adheres properly to the rim. You really need to focus on getting the darker clumps of glue off the rim ( if there are any) since those are mainly crystallized portions that will have no benefit to you at all.
If the glue on the rim/tire interface is still supple and clean, sometimes you can get away with putting another round of glue on each piece and re-gluing.
By far, for glue, my favorite and the favorite in the shop is Vittoria Mastik. It’s a great adhesive, easy to work with, and forms a really secure grip between the tire and rim. It’s not too sensitive to heat or cold, and tends to work well for road and cyclocross applications.
David Sommerville of Ifixbyx:
Normally we don’t remove too much of the older glue unless it starts to develop “lumpy” sections.
One key aspect at our shop is the use of “Acid Brushes,” which are inexpensive and allow thinner more even coats of glue. We also don’t re-use these brushes after a few hours. Thinner and even coats of glue tend to come off cleaner on the rims when removing tires. When gluing, new tires get 2 layers on the base tape. Old tires just one coat on base tape.
For Belgium Method, this varies slightly with an extra layer over the tape for final.
Deireck Ritter:
Better to leave a little glue on, I prefer 3m fast tack.
Jason Gardner, Jinji Cycles
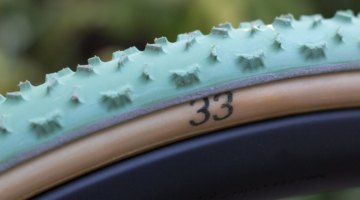
 product, ready for new tires. Kenton Berg")
The finished (clean) product, ready for new tires. © Kenton Berg
How much glue you leave depends on a few things.
1. How much is on the rim? If there’s a fairly nice layer, just scrape the thick or lumpy areas with a putty knife to smooth over
2. How even is the remaining glue? If the glue left on the rim is patchy, then you want to scrape the thicker areas down a bit and apply a couple coats (spaced out over at least 8 hours) to the thin areas to even it out
3. Has the remaining glue been contaminated? If the remaining glue has been contaminated with a lot of dirt or if you have started to removed some with a solvent, then you should clean as much as you can
4. How old is the glue? If it’s several years old, then do your best to get it clean, first by scraping it down and then using a solvent like acetone. If it’s just from last season, see previous advice.
For glue, I prefer Continental and Vittoria Masik One.