


 Tubeless tires are the norm for most off-road disciplines now after decades of refinement. The big advantage is fewer flat tires and low rolling resistance. The former is from the reduction of pinch flats and the addition of tire sealant to close the puncture. The latter is from the lack of hysteresis that comes from the interaction of a tube and tire. A huge benefit for the off-road rider is the ability to ride with lower tire pressure, further reducing rolling resistance, increasing traction, and increasing ride comfort. When tire pressure is low, the tire loses the support of the air, the sidewalls begin to fold adversely affecting bike handling, and the rim will take impact as the tire is compressed.
Cushcore is arguably the first tire insert. The invention by Adam Krefting in 2017 certainly put tire inserts on the map.
We reviewed Cushcore for gravel and found it advantageous. Since then other tubeless tire inserts have hit the scene and especially in the gravel segment, arguably the fastest-growing cycling discipline after e-bikes. In a short series, we’ll review a few of the more available products, and include a DIY option. We’ll consider how the inserts differ in protection and ride performance as well as ease of use.
New Kid on the Block
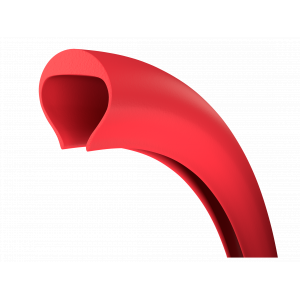
Tannus is not a new company. Airless tires were the core product for their first decade. In 2018 Tannus introduced Armour tire inserts for puncture protection of tires with tubes. Shortly after, the Armour Tubeless insert hit the market. A unique feature of the Tannus Armour Tubeless inserts among the others is a somewhat hollow cross-section and holes to allow better free flow of sealant to the outer air space of the tire where it is needed to seal a tread puncture. cross-section would appear like a “C” with the opening pointing down towards the rim. There are three sizes available, two for mountain bike: 29″ X 21.-2.5″, and 27″ X 2.1-2.5″, and one sized for gravel tires 700C X 33-47mm.

A rendering of the Tannus Armour Tubeless Gravel insert in cross-section. © Tannus
Our review set is for gravel, and with a minimum tire size of 33mm, cyclocross too. A firm closed-cell foam comprises the insert. It has the feel of dense polyethylene foam, smooth and certainly firmer than the other now-popular tubeless tire inserts. However, out of the box, the hollow cross-section is flattened out, and the opening of the “C” is pinched together to form a slit.

the Tannus Armour tubeless insert © C. Lee / Cyclocross Magazine
8 oval holes exist around the insert with two placed 180 degrees apart that have corresponding openings on the inner diameter for the valve stem, allowing the use of a standard top-opening stem instead of the side opening stem other inserts require. Imprinting marks these holes for ease of finding them for installation. The Tannus Armour Tubeless inserts for gravel weigh 67 grams each, on par with the claimed weight of 70 grams. For comparison, a standard 700C X 35-42 butyl tube weighs 160 grams. The retail price is 50 USD for one insert, 100 USD for a pair or 127 USD for a complete package with 2 small bottles of Stan’s sealant and a pair of aluminum tubeless tire valves with dust caps that have a valve core remover.

Another view of the underside of the Tannus Armour insert © C. Lee/ Cyclocross Magazine
The Armour Tubeless gravel insert is 35mm wide as it sits stretched on a rim, and in its flattened state is over 15mm thick. This indicates that it can provide some rim protection when collapsed, as it should do with a rock impact for example. It also gives some insight into the amount of sidewall interaction the insert may have with some tire widths.

The Tannus Armour tubeless on a 21mm internal rim © C. Lee / Cyclocross Magazine
Installation
Many ways exist to install a tubeless tire insert. I’ve found stretching a tire by mounting on a rim ahead of time helps. Tannus suggests mounting one bead of the tire (snapped onto the bead shelf of the rim) before inserting the Armour Tubeless into the tire. I found stretching the Armour Tubless insert onto a rim for a few minutes also helpful. It lets the insert unfold and the bit of stretching makes the insert easier to push onto the rim if the tire is in place.

the Tannus Armour tubeless insert has a slot to allow the use of a standard valve stem. © C. Lee / Cyclocross Magazine
For initial installation, I used a pre-stretched WTB Raddler 40 that has a bead-to-bead measurement of 96mm, so mounts a bit small on typical gravel rims between 21-25mm internal, measuring between 38-39mm when inflated to 25psi. The chosen rim to compare all the inserts is an older Bontrager Aeolus with a 21mm internal width. This tire and rim combination is burp prone in my experience, so I thought it a good benchmark to determine if the tire-to-rim seal is more reliable with the insert.
I followed Tannus’ instructions, mounting the tire, then releasing one bead to insert the Armour Tubeless, which I had also stretched on a spare rim for 15 minutes at room temperature. It was just like inserting a tube except for the need to stretch the last portion of the Armour Tubeless over the edge of the rim. I was sure to align the well-marked opening for the valve stem and recheck that it was clear in the opening after the insert was in place. Working the Armour Tubeless inside the tire so it is centered over the rim took a mild bit of work-like centering a tubular after mounting before the glue sets.
Put the tire bead back into the rim channel and push it under the Armour Tubeless insert assuring it is well into the center of the channel. The Armour Tubeless can’t reach its potential unless the slit opening is centered over the rim channel. A large, stiff plastic tire lever is helpful for this, or even better, the Cushcore Bead Dropper tool. It is easier to get the final portion of the bead over the rim if the rest of the bead is deep into the rim’s center channel. Even, then a leverage tool such as the Tannus P-Tool installation pliers, or some variation will be helpful. I used a Kool Stop Bead Jack. Again, a tire that is pre-stretched by being previously mounted on a rim helps this immensely in my experience.
Then, it is a matter of airing up the tire to seat the bead and adding sealant through the valve stem, which I did. Alternatively, you could add the sealant before you pop the final portion of the bead over the rim. This latter method avoids clogging the valve stem and is often easier with an insert in place since the insert can block or slow the flow of sealant through a valve stem. Theoretically, the valve hole and other holes in the Tannus Armour insert avoid this.
Certainly, mounting the Tannus Armour Tubeless insert was not difficult compared to a couple of the others in our review, and pouring sealant in through the valve stem was unimpeded. After inflation, you could hear the sealant sloshing around in the tire, indicating the free and easy distribution of the liquid.
Performance
The Tannus Armour Tubeless tire insert is flat and its hollow cross-section is closed out of the box. It is hard to tell if the Armour Tubeless tire insert fills the rim channel or opens up as in the cross-section rendering provided by the company. When mounting, the Armour Tubeless sits on the rim more than in the rim. We can infer that the size of the tire will put a varying amount of pressure on the side of the insert to open up the hollow shape, but I could not verify this. Deflate the tire and the insert feels flat. Removing the tire, the insert appears just as flat as when it was installed. When deflated I thought the effort to unseat the tire to remove the insert and add a tube was generally not extraordinary. It does seem that the insert blocks the top-opening valve stem. To deflate the tire I had to remove the valve core and push the insert up with a spoke to release the air. I can only surmise the insert shifts a bit with use since it appears the opening is still centered over the valve stem, and I could re-air the tire without a problem.
Thanks to the width of the Armour Tubeless it fills the bottom space of the tire well and supports the tire sidewall a bit. This allows riding with less air pressure than without the insert. As with any insert, though rim protection exists for all tire sizes in the recommended range, bead retention and sidewall interaction likely diminish on the wider end of the spectrum. While I feel comfortable riding this combination at 24 psi without the insert, I felt comfortable down to about 19 psi with the Tannus Armour before the tire began to fold and squirm. I was unable to induce a burp at 20psi, or even at 15 psi even as I kept riding into the curb in an attempt to induce one. I also did not hear the typical sound of the tire bottoming out to the rim. I rolled around with the tire completely deflated and it was better than no insert. The rim is not against the ground and neither is the tire sidewall, and the tire did not unseat as I cautiously rode the equivalent of 2/3 of a cyclocross lap around a test course. It is actually about the same as riding a flat tubular-perhaps better since there is a bit more cushion against the surface. I mentioned the Tannus Armour does not sit in the rim channel as snugly as the other inserts in the test, so I am not completely confident it will hold the bead on the rim with prolonged deflated riding, but it did for my test.

the Tannus Armour tubeless on a 21mm internal rim © C. Lee / Cyclocross Magazine
The Verdict
The Tannus Armour Tubeless tire inserts are effective at offering rim and burp protection. They are lightweight and offer some sidewall support that will depend on the width of your tire. These attributes allow lower tire pressure than without the inserts for increased comfort and control on rough, uneven surfaces. The Armour Tubeless inserts will also increase your confidence and protect the tire a bit in the event you need to ride on the flat tire for a stretch, though I will emphasize they are not run-flat type inserts as you might see made for other applications. For $50 per insert, the Tannus Armour Tubeless tire inserts are in the middle of the weight spectrum with performance on par with their competition.
There is no stated life expectancy of tire inserts in general. They are sacrificial to protect your rim and tire. Hard riding downhill mountain bike racers sometimes destroy the inserts in a few runs due to numerous hard strikes that otherwise would damage the wheels or tires. I only have short-term experience with all the inserts, but two sets have been in use for two to three years and I see no specific foam breakdown even after being bathed in sealant.
All that said, I have come to appreciate tire inserts in my mixed-terrain riding and find the advantage and peace of mind worth the minor weight penalty. I have raced some ‘cross races and found no demerit for my racing, but the knowledge of improved tubeless tire performance perhaps makes me push harder in the turns and go faster down the bumpy descents! I haven’t decided which insert is best for which application, so stay tuned for this multi-part series.
Tannus Armour Tubeless Tire Insert Specs:
MSRP: $50
Size: 700C X 33-47mm, also available 27.5″ and 29″ X 2.1-2.6″
Weight: 67 grams per insert as tested.
Warranty: against manufacturing defects, see company website for exclusions
More info: Tannusamerica.com