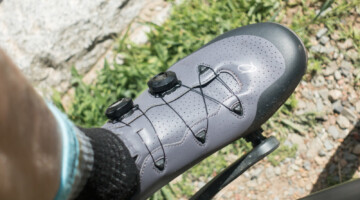

Belgian tape © Daimeon Shanks
Gut-Wrenching Mechanical Mondays makes its heroic return, this time under the guidance of Daimeon Shanks and Nick Legan – pro mechanics and co-owners of The Service Course repair shop in Boulder, Colorado. By now, many of you have tried other methods and experienced the dreaded rolled tubular. Here’s a method that’s ideal for holding onto cyclocross tires run at low-pressure. Look for more great tips and tricks from the pits every week!
by Daimeon Shanks
How to properly glue a ’cross tubular is perhaps the most covered topic in the cycling media this time of year – it’s practically on the front page of the Internet. So with that in mind, let me tell you how to properly glue a ’cross tubular.
When I was cutting my teeth as a teenage cyclocrosser in the muddy fields of Oregon, I was only ever given one piece of advice that stuck with me: there is no such thing as tire tread, only tire pressure. While I don’t wholeheartedly subscribe to that particular notion, I do firmly believe that a crappy tubular is still much better than good clincher when it comes to ’cross racing. The reason? You can run much, much lower tire pressure.
That is, if your tire doesn’t roll off. Here’s how to prevent that from happening:
Parts Needed:

All the necessary supplies © Daimeon Shanks
Tubular Glue (I prefer Vittoria Mastik One)
Belgian Tape
Acid Flux Brushes
Nitrile Gloves
Lint-Free Rags
Acetone
Mineral Spirits
Tubular Wheels
Tubular Tires
The Process (see Photo Gallery at the bottom for images of each step!)
- Prep your wheel. Rims (specifically carbon fiber rims) can come from the factory with a coating of surfactant (read: slick shit) on them. It’s necessary to completely remove this or your first layer of glue will not stick to your rim, which will lead to a catastrophic failure. Grab a pair of nitrile gloves and a clean lint-free rag. An old t-shirt that your girlfriend left in your laundry bin is good for this. Put a little acetone on your rag and wipe the gluing surface down until the rag comes away clean – shouldn’t take more than a couple of passes. If you have a previously glued rim, you don’t need to clean off the rim completely, just try and even out any spots where the glue is too thick or too thin.
- Prep your tire. Some tires like Vittoria come with a latex coating over the base tape and some don’t. If your tires do, try and scrap it off with a serrated butter knife or a clean bastard file. Or try using a bastard butter knife, if you can find one. Once the base tape is clean, grab your glue and an acid flux brush. Pump your tires up to around 20psi, or just enough that they take shape. Pinch the tire in your left hand (or your right hand, if you’re one of those people) and with your right hand spread a layer of glue onto your base tape with the acid brush. Doesn’t need to be thick, just enough to soak the base tape. Get all the way to the edges of the base tape. Let dry overnight in a warm place.
- First wheel pass. Place your wheel to be glued in your truing stand. You have a truing stand, right? You don’t?! Sucker. Find some other way to hold your wheel. Using an acid flux brush, spread an even, light layer of glue on the rim. Make sure that you spread the glue all the way to the edge of the rim, but be careful not to get too much glue on the braking surface. It can be cleaned off later, but it’s a pain. Let dry overnight in a warm place. This first layer needs to be cured at least 12 hours, preferably 24 so that it is fully adhered to the rim.
- Belgians! For cyclocross purposes, I use the Belgian Tape that can be bought at cyclocrossworld.com. It’s basically a double-sided duct tape that adds extra stickiness to everything it touches. I’ve looked EVERYWHERE for this in the States and still have not found it. Stu Thorne, the proprietor of cyclocrossworld.com imports it from Belgium. Damn you, Stu. Starting at the valve hole, stick the tape to your rim. Once the tape is on, peel off the tape’s backing and apply another layer of tubular glue over that Belgian Tape. Let wheel dry for 3-4 hrs.
- One last pass. So with two layers of glue and one layer of Belgian Tape on the wheel, one layer on the tire’s base tape, all that’s left is one more pass on the rim before sticking the tire. Spread this layer on just like all the others – light and even. Let sit for 3-4 minutes, or enough time to apply glue your other wheel.
- Stick your tire. Pump your tire up to around 20psi (or just enough to take shape). Take your wheel with the somewhat tacky glue on it and place it on the ground, leaning against your knees. Use some kind of protection on the ground, an old wheel bag or pair of nylon shorts works well. Don’t use anything that has lint or something that you don’t want ruined. Insert the valve into the valve hole and grab the tire about 8 inches away from the valve on each side. Pull downward forcefully as you stick the tire on to the rim. When you reach the other side of the wheel, lift it up and roll the last bit on to the rim. If you’ve been pulling hard enough on the tire, this last bit of the tire shouldn’t be too much of a struggle.
- Straighten your tire. Spin the wheel and check the straightness of your tire. You can move the tire left and right before the glue takes hold. When it’s as straight as you’ll get it, pump it up to around 60psi and leave to cure overnight before riding it.
That’s it! Remember, if you follow these instructions and you roll a tire, it’s still your fault. Happy riding!
Live in the Boulder area or plan on attending the upcoming Boulder Cup NACT weekend? Give The Service Course a call at (720) 225-7194 or email [email protected] to arrange an appointment for any mechanical needs. They’ll pick up and deliver bikes in the greater Boulder area for no extra charge!
Photo Gallery: