


In our Part II of our series on riding tubeless tires for cyclocross, you’ll learn how to convert your current wheels for tubeless, install sealant, and mount and inflate a tire. Also see our primer in Going Tubeless in Cyclocross Part I. Next up in Part III: More tips, observations, tricks, and more DIY tips. A version of this article by Josh Patterson was published in our Issue 3.
Convert your existing rims
Already have some nice clincher wheels and don’t want to throw down cash for another wheelset? Not a problem.

Seal your spoke holes with Stans or electrical tape
NoTubes sells a cyclocross rim strip and sealing tape to make your rims tubeless-ready. Or if you’re into experimenting, you can create your own – more on that in Part III.
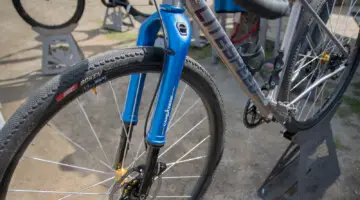
Some rims, like the very popular Mavic Open Pro, have a very deep center channel, also known as a drop channel. Rims with deep drop channels are more prone to burping air under hard cornering. Look at the rim profile on your wheels; deeper interior channels mean you’ll have to build up the inside more to prevent burping. “The idea is to increase the inner diameter of the rim to allow the tire to fit snugly while it is inflating,” says Larson.
Larson says that his shop has had good luck using tubeless rim strips with Mavic and Velocity rims. Koziatek says Bontrager rims are also good candidates for tubeless conversions. Higher-end Mavic Ksyrium wheels, with their sealed rim channel, have also been used by enterprising riders for tubeless conversions, but their deep channel requires quite a bit of build-up or a Stan’s rim strip in order to create a tight fit (i.e. the sealed rim does not really gain you benefits).
Larson’s tire of choice for tubeless conversions is the Michelin Mud2.

Install a tubeless valve on your taped rim
Setup tips:
Your first goal is to seal the spoke holes of your rim. If using ZTR 355 rims, use the tape included with the rims to seal the eyelets, otherwise pick up some NoTubes yellow tape or try strapping tape if you want to save some cash. Make a small hole in the tape and insert the air valve.
Install your tire like you normally would, but leave a small section of the tire off the rim. Pour sealant into each tire-for ‘cross tires, I’ve found ¼ cup sealant is enough.
Now finish seating the tire on the rim.
Before inflating the tire, spin the wheel to give the walls of the tire an even coating of sealant.
Now inflate the tire, you should hear a “snap” or “popping” noise, letting you know the tire is properly seated-try not to exceed 40 psi. Once inflated, spin the wheel again to ensure sealant covers interior of the tire. For best results, take a spin around the block to make sure the tires are holding air and to give the interior of the tires an even coating of sealant.

Adding 2 oz of sealant to the tire (our fingers are flow calibrated)
Some people rely on air compressors to inflate their tubeless setups. Will you have an air compressor to seat your tires come race day? Probably not-make sure you can re-seat your tires using a floor pump.
Hot tip: after inflating, rest the wheel horizontally on an open bucket, for 30-60 minutes per side to make sure the sealant really seals and “glues” your bead shut. And you thought tubeless would avoid the wait-before-you-ride of tubulars, huh?
Troubleshooting:
Can’t get the bead to seal up while inflating on your own rims? Try building up the center channel of the rim. Velox, electrical tape, and strapping tape all work well.
Have small leaks and bubbles coming from the tire bead? Inflate to 40 psi and tap the wheel on the ground; this will help seal the bead while making sure it’s properly seated on the rim. If this does not fix the leaks, try building up the center of the rim with more tape.
Not all tires work well for tubeless conversions. Some standard tires that work well for tubeless conversions. Check back in Part III of our series – we’ll have our recommended list of tires for tubeless conversions, if you’re not using a Stans or Hutchinson tire.
Before race day:
No one likes mechanicals. To ensure your tubeless setup is ready to rock come race day, try these simple tests.
Settle on a ballpark estimate of tire pressure, close to the pressure you think you’ll be racing on. In a lawn or field-soccer fields work great-practice taking sharp turns at speed and leaning the bike over as far as you are comfortable. If your tires burp or squirm like they’re about to roll, add more air.
Do some bunny hops and ride off curbs to ensure your setup is sound. Practicing remounts is also a good method to test for a reliable tubeless setup.
Drawbacks of the NoTubes Rims/Wheels
Since this tubeless setup relies on using a rim designed for mountain bikes, there are some obstacles to overcome.
First, if you’re going to run a wheelset using NoTubes rims and you want to have a spare set of wheels, your backup wheelset should also have the same rims. If the wheels waiting for you in the pit are laced to narrower road rims, you’ll need to adjust your brakes when you swap wheelsets…unless you can tolerate brakes that barely contact the rims when you’ve got your levers buried against the handlebar. The difference in width is significant.
Speaking of braking, know that these rims do not have a machined braking surface-something Koziatek is working on. In the meantime, if you want the improved braking performance offered by machined sidewalls, make your own. Tip: To remove the anodizing, cut Scotch Brite cleaning pads to fit over your brake pads and ride around the block a few times.
Your hub choice may be limited. NoTubes only makes their 700c rims in a 32-hole drilling.
Drawbacks of Tubeless
Lightweight flat protection comes at a price. Tubeless can be messy. Welcome to the world of latex sealant oozing out of tire beads and spraying out of sidewall cuts in the process of sealing your tires.
They aren’t tubulars. Old-schoolers may thumb their nose at the notion of a tubular replacement. The ride is not as supple as that of high-end tubulars, with their higher thread count, supple casing. While you may be able to ride pressures almost as low as tubulars (if you have an ideal setup), the casing of your tire will not be as supple as your Grifos. But the price isn’t as high either.
Let’s sum it up!
The benefits over tubes:
- Lower pressure
- Lower rolling resistance
- Improved traction
- Flat protection
- Low weight
The benefits over tubulars:
- Greater tire selection
- Ease of swapping tires
- Lower price
- Ease of setup
Also, see Part I and Part III of this series on tubeless cyclocross tires.
This is just a sample of one of the many in-depth articles found in our print magazine. Not a subscriber yet? Subscribe today and find out what you’re missing! Each magazine is packed with in-depth content with rider interviews, tech articles, product reviews, behind-the-scenes race reports, and counter-culture and sandbagging features.