


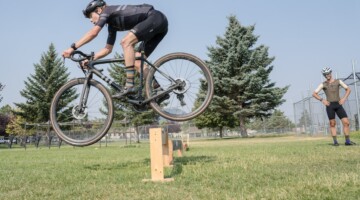


With his elbow inside of his seat, Curtis White is able to easily get his bike high enough to clear the barriers, and quickly run through them. © Kevin White / Cyclocross Magazine
Our last Technique Tuesday featured Adam Myerson giving cyclocross racers the ins and outs of getting off their bikes. His tips on when, how and why to dismount in cyclocross featured clear instruction on how and why each style of cyclocross dismount should be used, and common pitfalls to avoid.
This week, Myerson will examine what to do when you get off the bike. His tips on suitcasing your bike correctly will be an aha! moment for many racers, especially shorter ones, who are tired of kicking their bikes while running over barriers or feel that they just can’t get their bike high enough to clear the barriers.
You can find other training ideas and articles at cycle-smart.com, as well as information on internationally-recognized coaching and clinic programs for all skill levels.
by Adam Myerson
When I teach technique in a clinic, I most often start by demonstrating bad examples, because very often riders can relate to that and use it as a starting place. They recognize themselves and can identify with it, often exclaiming “Oh, right, yes! That’s totally what I do!” I’m able to take it from there, show them not only the correct style, but also how to get there.
One of the challenges to teaching good technique is that there are so many top level riders, men and women, with terrible habits, setting bad examples. There are many factors that go into being a top rider, and technique is only one aspect. It’s possible to get into the elite bell curve with watts or good form; the absolute best have both. Even riders who win can win by more, or more often, by continuing to make changes or improvements to their style. Their success is often in spite of their technique, not because of it.
One of the glaring examples of this shows up when suitcasing, or carrying the bike by the top tube for something short like a set of barriers or short run, especially where the bike has to be lifted for an obstacle, but shouldering is not required. The primary mistake I see riders make, even the best riders, is lifting the bike with their elbow on the outside of their saddle, causing them to put their saddles directly into their armpits. This is bad for a myriad of reasons, easily correctable, and actually hugely important.

Suitcasing with your elbow outside of the saddle limits how high you can lift the bike, requiring racers to jump the barriers to give their wheels clearance. © Leman Northway
When you lift the bike with the elbow on the outside and the saddle in your armpit, it limits how high you can lift the bike, and in turn, how successfully you can run over a set of barriers. When you see riders, especially smaller riders, jumping over barriers when they could simply be running over them, it’s not because the barriers are too high for them to lift their feet over, it’s because they can’t get their wheels over the planks without jumping.
In this case, lifting the bike with the elbow on the inside between your body and your bike allows you to lift the bike well past the limit of the saddle in your armpit, at least to chest height, and higher as needed. Knowing that your wheels will now be higher than the planks means you do not have to jump over them, you can simply run over them, albeit with high steps. This allows you to run over the barriers faster, and with less energy, because your energy is going forward, not up and down. This may not be a problem if you’re Ryan Trebon or Helen Wyman, but very few of us are that tall.
Another negative to carrying the bike with your elbow on the outside of the saddle is that it causes the bike to be positioned too close to your body, increasing the likelihood you will kick it while running. When you suitcase the bike for a set of barriers, you really aren’t even carrying it, ideally. You’re aiming to snap it up quickly with an explosive movement, and it should almost float in the air next to you as you run, parallel with you, in an arc. If the bike is under your arm and against your body, you have to really carry it and hold it there, and you will likely be bumping into it, limiting how fast and free you can run, and increasing the chances of kicking your pedals, causing you to possibly drop your chain, but definitely leaving them in a random spot for the remount.

Suitcasing your bike with your elbow outside the saddle often times requires you to angle your bike away from you, requiring more force in the wrong direction. © Todd Prekaski
You will see some riders who carry with the elbow on the outside adjust for that by levering or angling their bikes out and away from them. But this not only requires more force, it’s energy in the wrong direction, and puts your bike in someone else’s space. If you’re going over a set of barriers side by side with another competitor, the last thing they’re expecting is your bike to tilt out toward them. It’s inefficient, and risky.
The proper approach for a fast, efficient suitcase includes the following steps:
- As you approach an obstacle, begin the process by clipping out of the left pedal, riding on your instep unclipped, and swinging the right leg around the back of the bike. (Reference my previous dismount article for more information about that.)
- Whatever dismount technique you use, the next step is to allow the saddle to make contact with your hip as your right leg swings around.
- As your hip touches the side of your saddle, you can then take the right hand off the handlebars and move it to the top tube while coasting up to your obstacle. The weight of the bike against your hip is what allows you to remove the right hand from the bars without crashing. It replaces the right hand as the point of contact.
- As you step off, there should be a snap up on the top tube with your arm, in a motion resembling the clean portion of a clean and jerk. This is what gives the bike “air” rather than actually carrying it. You may even lift high enough to turn your wrist under the top tube for a little extra support as you run over a set of planks.
- When it’s time to put the bike back on the ground, it’s absolutely crucial not to drop it, but to lower it and place it, even putting a little weight on it once it’s down to keep it from bouncing. You can’t remount a bouncing bike, and you’re more likely to have a mishap if you simply drop it. Again, if you snap hard enough and lift high enough, the bike should be slowly coming back to the ground on it’s own, and you’re simply guiding it as it floats beside you in the air.
- Your right hand can then return to the bars as you prepare to remount.
While there is a lot of specific detail in this article, I really could have boiled it down to one important point: keep your elbow on the inside when you suitcase. If you focus simply on that, the rest will follow.
Want more tips on cyclocross technique and training? Take a look at our Cyclocross Academy archives.