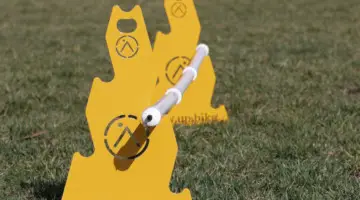


15 minutes and 15 dollars is all you need to build a set of practice barriers. © Molly Hurford
Was your New Year’s Resolution to practice your cyclocross skills? Are you and some friends planning to spend a few days this summer working on your cornering and barriers? Did you forget to pick up a Father’s Day present? If any of those ring true, you should check out CrossPropz, the collapsible practice barriers, or if you’re feeling crafty, build a pair yourself!
Building a set of collapsible barriers with PVC pipe is a piece of cake. If you’ve ever attending a cyclocross practice session, you probably have seen a set of PVC barriers erected. For one thing, they’re incredibly easy to break down and set up. An added bonus is that if a newer, more unsteady rider crashes into them (or if a seasoned pro comes in too hot and crashes into them), it won’t really hurt anything but his or her pride.
However, PVC barriers shouldn’t be reserved for the one night a week when you attend a local practice session. Rather, you should have them handy for practice whenever you feel the need to work on technique (and at the beginning, that might be a lot). If you have a big backyard, set up barriers there. If you don’t, find a nearby field or park to set up in, just make sure you aren’t trampling nicely manicured soccer fields! (And no, riding through a baseball diamond doesn’t count as training for the sand pit. It’s just rude.)
Parts:
- Two 10 foot lengths of PVC pipe (available at Home Depot or Lowes in the Plumbing aisle). A width of 1 and 1/4 inches is good, it’s sturdy without being bulky.
- Four 90 degree Elbows (make sure they’re made for the same width as the PVC pipe (1 and 1/4 inches)
- Four Slip T’s (again, make sure they’re the correct width)
- 2 Joiners (if you want to make your barriers easy to transport
- A PVC cutter, hacksaw or circular saw, and the appropriate safety goggles
- Tape measure
Caution: building these barriers does involve the use of saws, so be careful and take every safety precaution.
Building the Barriers:
- First, measure out where you need to cut:
On the first ten foot piece, divide it into two pieces, five feet long each.
On the second piece, divide it into 12 ten inch increments.
Make four legs like this. © Molly Hurford
- Then, carefully using your sawing method of choice, cut the pieces at the points you marked.
- Assemble four sets of legs, using three of the ten inch pieces joined together with a Slip T (see picture). (Alternatively, get creative and save PVC by making an upside down V-shape.)
- Put the four elbow pieces on the ends of the long pieces that you’ve cut.
- Then, simply attach the legs to the longer pieces.
- If you want to make the barriers easy to transport, you can cut the long pieces in half and use the joiner pieces to put them back together. This makes the barriers small enough to fit in a large messenger bag, which makes them great for bringing to practice or, when you get tired of your backyard, a nearby park.
- Practice, practice, practice! Even if you don’t have a cyclocross bike (yet), you can practice on a road or mountain bike.

We promised cheap and easy barriers, and the final cost came in under $15 and the time (other than the shopping for PVC) was well under 15 minutes. Now, all you have to do is start practicing. Coming soon, we’ll show you how to take barriers and showcase how different pros suggest learning how to take them. You’ll be hitting them at full speed in no time!
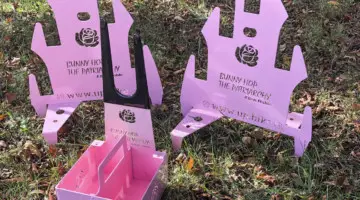
If you’re not the DIY-type, or you want a sturdier set that will snap back no matter how hard you crash into them, check out CrossPropz Portable Cyclocross Barriers. We recently reviewed them and they’re great and ultra-transportable.