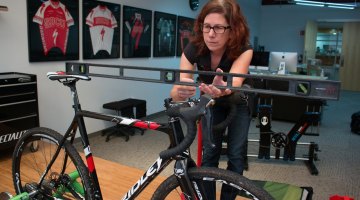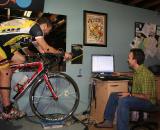


Retül bike fit: Geeking out over data between runs © Brody Boeger
Spring has (just barely, and not very convincingly in many places) sprung, and for many of us it’s the perfect time to take a good hard look at our bike positions. Or, better yet, have a well-trained professional give your riding setups the eyeball. Think about it – we’re turning the cranks at least 80 times per minute, often for hours on end. Little changes can make huge differences, both in performance and in a body’s well-being. A truly expert bike-fitter can use a combination of angle measuring and old school visual assessment to bring your position to a happy place. In the right hands, the Retül bike fit system can help to even further hone the all-important perch adjustment process via 3-D motion capture and computer analysis. To put it in perspective, this is the same fitting system used by top-tier teams like Team Sky and Radio Shack (combined with visits to the wind tunnel, mind you!)
Personal Bike Fitting History
My long time coach, John Verheul of JBV Coaching, used a combination of watching me ride on the roads, measuring angles and eying my spin on a stationary trainer. We’d have periodic check-up fittings over the years, as my body continued to adapt to progressively heavier training load and I worked to increase – or at least maintain in the face of lots of miles – my flexibility.
Although I always knew that I had a hitch in my giddyup – my right knee flares out mid-pedal stroke – it wasn’t until a visit to Seth Hosmer, a Portland chiropractor who also happens to be a kickass local Cat 1, several months ago that I learned that I had a leg length discrepancy. It took a series of x-rays to determine that my right, dominant leg was a full 12.5mm shorter, with 12mm of the difference in the femur.

Putting on the LED harness © Brody Boeger
Enter the Retül
I went into Cyclepath, my local shop, armed with my road, time trial and cyclocross bikes to see co-owner and one of Portland’s expert bike fitters, Bill Larson. Although Larson worked for several years doing traditional bike fits with great success, he was drawn to the Retül as a way to maximize his customer’s performance.
The Retül works as a motion capture device, but with software that makes it specifically suited to cycling. The rider pedals away with small LEDs stuck to the key pivot points of the body. A scanner mounted several feet away reads the LED output off of the body harness and sends the information on to a computer.
“The scanner reads LED output off of the harness going down your body, a string that puts LEDs at each crucial pivot point along your body,” said Larson. The scanner can see it both in terms of up, down, side to side, as well as the LED coming towards it or moving away from it – so it’s fully 3-dimensional. It can see what your knees are doing, if your hips are moving towards or away from it for the whole pedal stroke. It’s not just a glimpse from any given spot.”
The process happens one side at a time and is accurate to fractions of a millimeter. While most riders may not have such stark differences between left and right, variations are not uncommon – and it’s crucial to detect them and make adjustments accordingly. A purely visual approach to a bike fit involves static measurements of a rider’s position. With video analysis, the fitter will step through frames and take angle measurements off of still images. With the Retül, the fitter gets a constant, dynamic analysis of the pedal stroke in motion with a stream of detailed position data and angles. Knee flexion, extension angle, knee lateral travel, back angles, hip angles as well as upper body angle data are all being recorded multiple times per second. The results can be plotted and analyzed, then the position subtly changed and the differences assessed.
Retül has developed recommended ranges for the various angles based on rider level and historical, proven data. The proficient fitter will typically seek to get the rider within these ranges as a starting point, then see what effects various subtle changes will have.

The road shoes, with a big ole shim under the right cleat © Brody Boeger
The Numbers
Credit where credit is due – Larson was impressed by how good Verheul’s initial mostly eyeballed setup was. However, while it was efficient for my shorter right leg, the Retül revealed that it wasn’t allowing my left leg to extend to its full potential. The solution was relatively simple – because the length discrepancy was primarily in the femur, I could shim the shorter leg under the cleat. This has become modern bike-fitters’ preferred technique when no canting adjustments are needed, and Bike Fit makes handy-dandy pre-cut shims for most major pedal systems. We experimented with different amounts and settled on 6mm of shims, about half of the leg length difference. We also raised the saddle up about 6mm, which meant that my shimmed right leg would feel about the same as before, but my left leg would get that much more extension. While this was still a compromise (my left leg would ideally like even more extension), it gave me the cleanest looking combined pedal stroke for both legs under the Retül’s watchful gaze.
Although not an issue for me, when angling adjustments are necessary to correct knee placement or other imbalances, ITS (In the Shoe) wedges are the solution. “Fitters used to shim between the shoe and the cleat for angle corrections, which could make clipping in difficult since the shoe needed to be held at an angle for the cleat to line up squarely with the pedal,” said Larson. “Obviously that would be particularly problematic for ‘crossers who need to clip in quickly. The ITS wedges, which go between the footbed and sole of the shoe, give you the tilt on the inside and keep the clip-in movement perpendicular and easier.”

Motion capture! © Brody Boeger
My right knee continued to flare out laterally during the pedal stroke, no matter where we set the saddle, with an average lateral travel of 39mm per pedal stroke. 40mm is Retül’s standard “red flag” indication of an issue. Since it has never led to any kind of pain or injury, and it doesn’t appear to be a compensation for a physical problem, it looks like that’s just how my body’s going to pedal and not something that I can (or should) correct.
After shimming and lots of small adjustments, I reached what we decided was my equilibrium, with a right knee flexion of 109 degrees, right knee extension of 34 degrees, left knee flexion of 113 degrees and left knee extension of 35 degrees (ideal flexion range is slightly under 110 to 115 degrees, ideal extension 30 to 40 degrees). My ankling maximum, measured at the bottom of the pedal stroke, was well within the 95-105 degree guidelines. The Retül also confirmed that the 172.5mm cranks I have on all of my bikes are probably my best option.
Once we had the lower body pretty well nailed down, we played with upper body position. This is where a rider would assess top tube / stem length as well as handlebar width and drop. My elbow and wrist angles were within range, and my back, at 41 degrees when on the hoods, was at the aggressive end of a road position. We played with raising and lowering the bars by adding and subtracting spacers underneath the stem on the fork steer tube. We were looking at body mechanics more than power, although the two are clearly related. If I went much lower than my current setup, my pedaling form started to break down quickly with my knees tracing elliptical rather than relatively straight paths.
The next step was to take all of this information and bring it over to my other bikes….
Check out Part II of this article, where we look at how we adapted the fit numbers to the cyclocross bike and talk more about the Retül fitting process. Although there’s a lot of hard data involved, the process still involves a healthy dose of art mixed with the science.
Photo Gallery: